Checking Basic Information on Charging Your Electric Vehicle
Before charging your vehicle, check and understand the information such as the expected charging time according to the charge type, checking the State of Charge (SOC), and setting the charger lock mode.
The charge types for electric vehicle are as follows:
-
AC charge: The electric vehicle is charged via an AC charger at public or private charging stations.
-
DC charge: You can charge at high speeds at public charging stations. Refer to the respective company's manual that is provided for each DC charger type.
-
Portable charge: If the vehicle cannot be moved to a public charging station due to a lack of battery power, the vehicle can be charged with household electricity, using the 120 V ICCB portable charger included with the vehicle.
Type 3R enclosure satisfies the requirements of UL 50E standard when the charging connector is connected to the vehicle side charging inlet. An additional Type 3R enclosure should be provided in the end installation of the vehicle side charging inlet. The "Type 3R" marking can be found on the charging inlet.
-
What is type 3R?: Performance requirement for enclosures intended for outdoor use that provides a degree of protection against falling dirt, rain, sleet, and/or snow.
-
Risk of electric shock. Do not disconnect under load.
-
Suitable for use on a circuit capable of delivering not more than 5,000 rms symmetrical Amperes, 120 V AC Maximum.
-
Suitable for use on a circuit capable of delivering not more than 30,000 rms symmetrical Amperes, 1,000 V DC Maximum.
-
Battery performance and life may deteriorate if the DC charger is used constantly. It is best to occasionally use AC charger to optimize battery life.
-
The electrical outlet at home must comply with regulations and safely accommodate the Voltage, Current (Amps), and Power (Watts) ratings specified on the portable charger. If not, the vehicle may not be charged or safety hazards, such as fire, may occur.
-
If the power distributor exceeds its capacity while charging the vehicle with a portable charger at home, the power to home may be cut off or a fire may occur.
-
If you use a portable charger to charge your electric vehicle with household electricity, you are charged on your household electricity bill.
The estimated charging time for each charging type is as follows:
|
Charging type |
Charging time |
Charge level (Minimum - Maximum) |
Charging condition (Temperature) |
||
|
Standard |
Long range |
||||
|
AC charge |
About 4 hours 55 minutes |
About 6 hours 5 minutes |
10-100 % |
Battery temperature (77 °F) |
|
|
DC charge |
350 kW |
About 43 minutes |
About 43 minutes |
10-80 % |
|
|
100 kW |
About 45 minutes |
About 45 minutes |
10-80 % |
||
|
Portable charge |
About 42 hours 55 minutes |
About 57 hours 5 minutes |
10-100 % |
||
-
The DC charging time may be longer at cold temperature below 20 °F (-17 °C).
-
Depending on the condition and durability of the high voltage battery, charger specifications, and ambient temperature, the time required for charging the high voltage battery may vary.
-
If the charger is worn out, exposed, or there exists any type of damage, charging may stop for your safety. Use another charger that works normally.
-
When charging the battery, an additional 3 minutes may be required to check battery condition.
Check the State of Charge (SOC) of the high voltage battery via the charge indicator light inside the charging door.
-
With the vehicle door unlocked, press the open indicator on the charging door to open the charging door.
-
Check the SOC referring to the charge indicator light inside the charging door.
-
SOC is indicated in 4 levels.
-
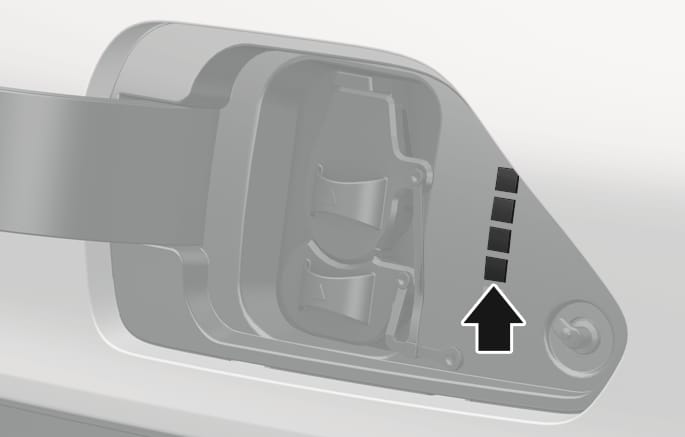
2C_ChargingDoorIndicator_CCS1
|
Charge indicator light |
SOC [%] |

|
0-24 % |

|
25-49 % |

|
50-74 % |

|
75-100 % |
Open the charging door and check the information on the charging label on the right side of the charging connector. The charging label shows safety symbols and the rated input specifications for charging.
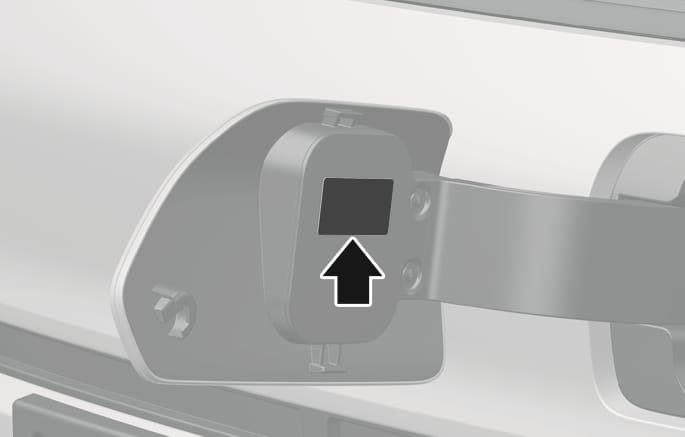
2C_ChargingLabelLocation
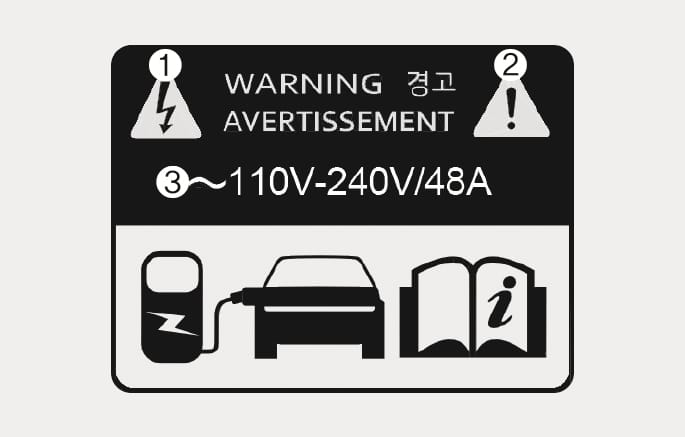
2C_ChargingLabel
|
No. |
Name |
Description |
|
(1) |
Warning for high voltage |
Indicates a device with a risk of electric shock. |
|
(2) |
Warning/Caution symbol |
Indicates a device that may cause property damage, serious injury or death if not operated carefully. |
|
(3) |
Rated voltage and maximum charging current |
Indicates the type of input current (~, AC) and the rated voltage range (V) and charging current (A) when AC charging. |
You can lock the charging connector during AC charging to prevent unintended detachment of the charging connector from the vehicle.
The connector is automatically locked during DC charging or while using the V2L function, regardless of the settings of charging connector locking mode applied to the vehicle.
-
When DC charging is complete, the charging connector will be unlocked automatically.
-
After using electricity, you can unlock the charging connector by pressing the switch on the V2L connector to turn off the power and unlock the vehicle door.
-
On the Home screen from the infotainment system, select Electric Vehicle >
Ĥ > AC Charger > Lock Charging Cable to set the locking mode of the charging connector.The available locking mode options are as follows:
-
Always: Locks the connector automatically whenever the charging connector is plugged into the charging inlet.
-
While charging: Locks the connector automatically only while charging is in progress after the charging connector is properly connected to the vehicle.
-
Disconnecting the charging connector in an emergency
If the unlock button is not functioning properly due to a discharged battery or abnormal electrical wiring, the charging connector cannot be disconnected from the vehicle.
Do not disconnect the charging connector forcibly. Doing so may damage the charging connector or the charging inlet on the vehicle.
If the charging connector is not disconnected due to battery being fully discharged or a wiring failure, open the hood and pull the emergency cable.
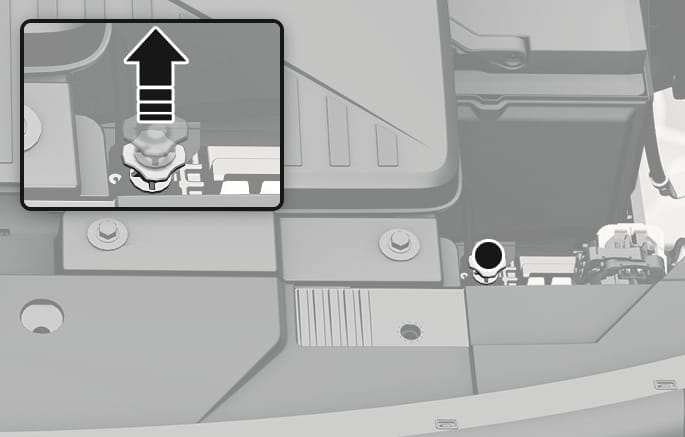
2C_EmergencyChargingCable
-
If the charging connector does not disconnect after pulling the emergency cable, have your vehicle inspected by an authorized HYUNDAI dealer.