Using a portable charger (ICCB)
If the vehicle cannot be moved to a public charging station, you can charge the vehicle using a separately purchased In-Cable Control Box (ICCB) in places where general power (AC 220 V/230 V) is supplied.
Before charging the vehicle, carefully read and follow the instructions in "Safety precautions for charging your electric vehicle" to prevent property damage or injury due to electric shock, fire, explosion, etc.
To prevent property damage or injury due to fire or explosion, follow the instructions below.
-
Only use a genuine HYUNDAI portable charger (if equipped).
-
Do not let children operate or touch the portable charger. Doing so may lead to unexpected accidents.
-
Do not use an extension cable.
-
The charger power you are using must comply with regulations and safely accommodate the voltage, current (amps), and power (watts) ratings. If not, the vehicle may not be charged or safety hazards, such as fire, may occur.
-
If the power distributor exceeds its capacity while charging the vehicle with a portable charger at home, the power to the home may be cut off or a fire may occur.
-
Immediately stop charging if you discover abnormal conditions, such as odor or smoke.
-
If you charge the vehicle with household electricity, you are charged electricity bill according to the home rate system, not the electric vehicle rate system.
The configuration of a portable charger and the display of the operation indicator are as follows:
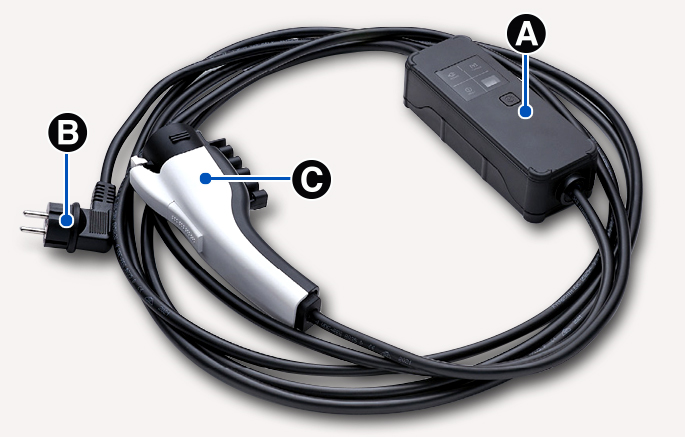
2C_ICCBCharger
- Control box
- Power plug
- Charging connector
|
Icon |
Name |
Color |
Description |
|

|
READY |
Green |
Turns on when the power is on. |
|

|
CHARGE |
Blue |
Turns on while charging and blinks when current is limited (Forcibly switched to 6 A). |
|

|
FAULT |
Red |
Blinks when a leakage current, communication error, or overcurrent error occurs, or when the high-temperature protection inside the plug and charger is activated. |
|

|
CHARGE LEVEL |
- |
Displays the present charging current setting (6 A, 8 A, 10 A, or 12 A). |
|

|
E1 |
Control pilot communication |
- |
Vehicle communication error |
|
E2 |
Leakage |
- |
Current leakage |
|
|
E3 |
- |
Charger error |
||
|
E4 |
Plug temperature |
- |
Plug overtemperature warning |
|
|
E5 |
- |
Plug temperature failure |
||
|
E6 |
- |
Charger error |
||
|
E7 |
Overcurrent |
- |
Charging overcurrent warning |
|
|
E8 |
Internal temperature |
- |
Charger overheating |
|
|
E9 |
- |
Charger error |
||
|
F1 |
Relay fusion |
- |
Charger error |
|
|
F2 |
Ground Monitoring/Interrupt |
- |
Poor grounding of outlet |
|
|
F3 |
Switched mode power supply power failure |
- |
Switched mode power supply error (voltage failure) |
|
|
F4 |
- |
Switched mode power supply error (abnormal voltage) |
||
|
F5 |
Control Pilot voltage error |
- |
Control Pilot (-) voltage error |
|
|
F6 |
- |
Control Pilot (+) voltage error |
||
|
F7 |
Temperature sensor error |
- |
Plug temperature sensor error |
|
|
F8 |
- |
PCB internal temperature sensor error |
||
-
If an error occurs, you can reset the portable charger by disconnecting and reconnecting the power plug, and then pressing the button on the control box for more than 2 seconds.
-
If the same symptom repeats after resetting the portable charger, we recommend that your vehicle be inspected by an authorized HYUNDAI dealer.
-
If there is no status change for more than 1 minute, the portable charger is switched to power saving mode, and the display light is turned off.
Follow the instructions below to charge the vehicle with a portable charger.
-
Connect the power plug of the portable charger to the electrical outlet at your home.
-
The power indicator light on the control box turns green.
-
-
Set the charging current by pressing the button on the control box for more than 2 seconds until the number on the charging current indicator blinks.
An example of a portable charger charging current setting suitable for the rated current of the power supplied is as follows. However, the appropriate charging current may vary depending on the environment, such as the power usage inside the building.
Outlet current
ICCB charge level
14-16 A
12 A
12-13 A
10 A
10-11 A
8 A
8-9 A
6 A
-
The charging current is changed each time the button is pressed, in the order of '6 A - 8 A - 10 A - 12 A'.
-
If 10 seconds have passed without pressing any button, the blinking stops and the charging current setting is finished.
-
-
With the vehicle on, apply the Electronic Parking Brake (EPB) while pressing the brake pedal.
-
Turn all switches off, shift to P (Park), and turn off the vehicle.
-
With the door unlocked, open the charging door by pressing the sign of opening.
-
Open the charging inlet cover and check the charging connector and charging inlet for dust or other contaminants.
-
If there is any dirt or contaminants, remove it using the air gun.
Do not touch the charging connector of the charging cable or the charging inlet of the vehicle.
-
-
Remove the charging connector protection cap of the portable charging cable, hold the charging connector handle, and connect it to the AC charging inlet of the vehicle. Push it until you hear a click.
-
When scheduled charging is set, "Waiting to charge at scheduled time" is displayed.
-
When scheduled air conditioner or heater operates while waiting for the scheduled charging, the estimated charging time is displayed as'-'.
-
-
When charging is complete, hold the charging connector handle with the unlock button pressed and pull on the charging connector to disconnect it from the charging inlet.
If you have set the charging connector locking mode as Always or While charging, unlock the door by pressing the button on the smart key or the button on the driver's door, and disconnect the charging connector from the charging inlet.
-
For more information, refer to the "Setting charging connector locking mode" section in this chapter.
-
-
Close the charging inlet cover.
-
Press the charging door to completely close it.
During portable charging, the quality of radio reception may degrade in some areas.