Seat Belt Restraint System
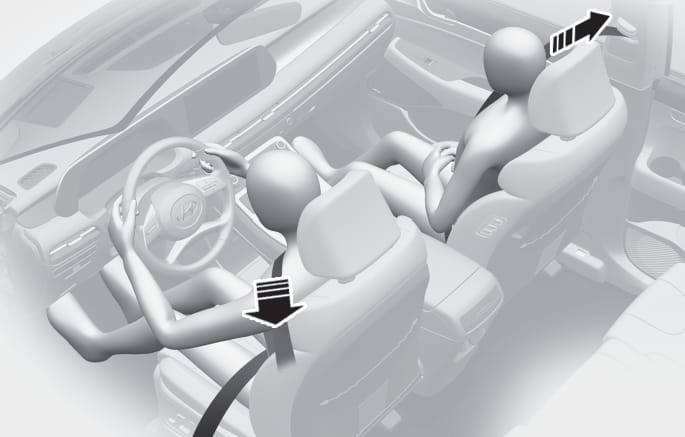
Improperly positioned seat belts may increase the risk of serious injury in an accident. Take the following precautions when adjusting the seat belt:
-
Position the lap portion of the seat belt as low as possible across your hips, not on your waist, so that it fits snugly.
-
Position one arm under the shoulder belt and the other over the belt, as shown in the illustration.
-
Always position the shoulder belt anchor into the locked position at the appropriate height.
-
Never position the shoulder belt across your neck or face.
B0059KO05
To fasten your seat belt:
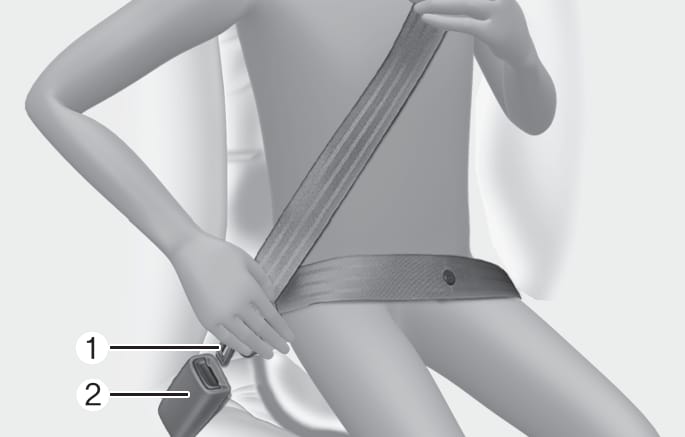
Pull the seat belt out of the retractor and insert the metal tab (1) into the buckle (2). There will be an audible “click” when the tab locks into the buckle.
B0059KO06
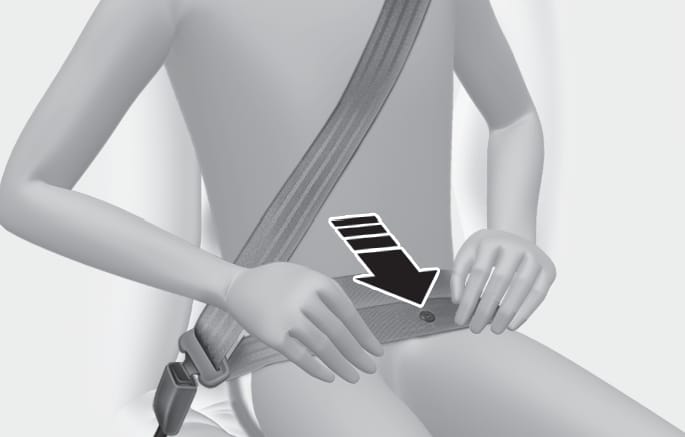
You should place the lap belt portion across your hips and the shoulder belt portion across your chest.
The seat belt automatically adjusts to the proper length after the lap belt portion is adjusted manually so that it fits snugly around your hips. If you lean forward in a slow, easy motion, the belt will extend and move with you.
If there is a sudden stop or impact, the belt will lock into position. It will also lock if you try to lean forward too quickly.
If you are not able to smoothly pull enough of the seat belt out from the retractor, firmly pull the seat belt out and release it. After release, you will be able to pull the belt out smoothly.
Height adjustment
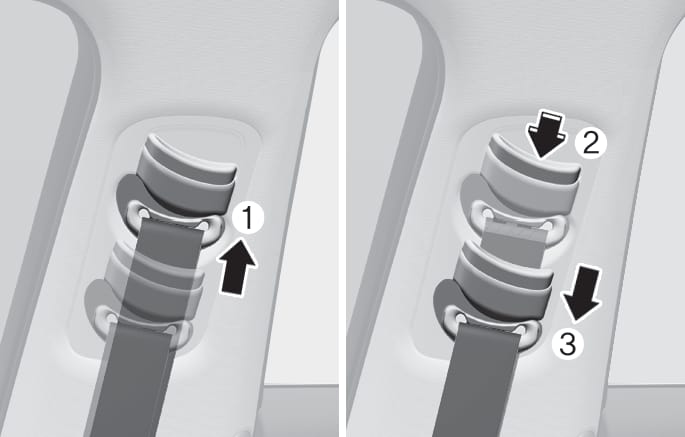
You can adjust the height of the shoulder belt anchor to one of the four different positions for maximum comfort and safety.
The shoulder portion should be adjusted so it lies across your chest and midway over your shoulder nearest the door, not over your neck.
B0059KO07
To adjust the height of the seat belt anchor, lower or raise the height adjuster into an appropriate position.
To raise the height adjuster, pull it up (1). To lower it, push it down (3) while pressing the height adjuster button (2).
Release the button to lock the anchor into position. Try sliding the height adjuster to make sure that it has locked into position.
B0059KO11
To release your seat belt:
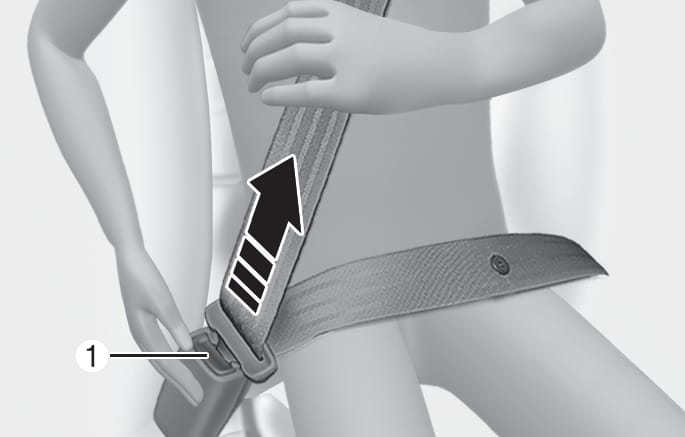
Press the release button (1) in the locking buckle.
Once it is released, the belt should automatically draw back into the retractor. If this does not happen, check the belt to be sure it is not twisted, then try again.
This type of seat belt combines the features of both an emergency locking retractor seat belt and an automatic locking retractor seat belt. Convertible retractor type seat belts are installed in the rear seat positions to help accommodate the installation of child restraint systems. Although a convertible retractor is also installed in the front passenger seat position, NEVER place any infant/child restraint system in the front seat of the vehicle.
To fasten your seat belt:
Pull the seat belt out of the retractor and insert the metal tab into the buckle. There will be an audible “click” when the tab locks into the buckle. When not securing a child restraint, the seat belt operates in the same way as the driver’s seat belt (Emergency Locking Retractor Type). It automatically adjusts to the proper length only after the lap belt portion of the seat belt is adjusted manually so that it fits snugly across your hips.
When the seat belt is fully extended from the retractor to allow the installation of a child restraint system, the seat belt operation changes to allow the belt to retract, but not to extend (Automatic Locking Retractor Type). Refer to the “Child Restraint System (CRS)” section in this chapter.
B0059KO11
To release your seat belt:
Press the release button (1) in the locking buckle.
When it is released, the belt should automatically draw back into the retractor. If this does not happen, check the belt to be sure it is not twisted, then try again.
Although the seat belt retractor provides the same level of protection for seated passengers in either emergency or automatic locking modes, the emergency locking mode allows seated passengers to move freely in their seat while keeping some tension on the belt. During a collision or sudden stop, the retractor automatically locks the belt to help restrain your body.
To deactivate the automatic locking mode, unbuckle the seat belt and allow the belt to fully retract.
B0059KO12
-
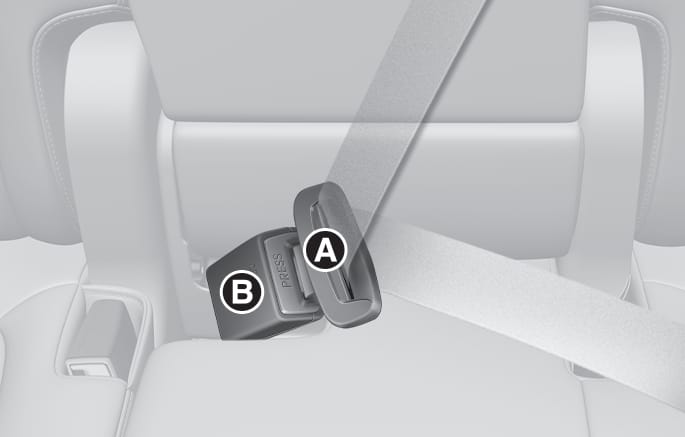
Take out the buckle (B), which is stored between the seat/seatback cushions.
-
Insert the metal plate (A) into the buckle (B), until it clicks.
You can make sure its secure fastening by pulling the seatbelt webbing. The buckle with 'CENTER' mark should be used for the 3-point seatbelt.
-
Restore the buckle between the seat/seatback cushion after unfastening the seatbelt.
B0059KO08
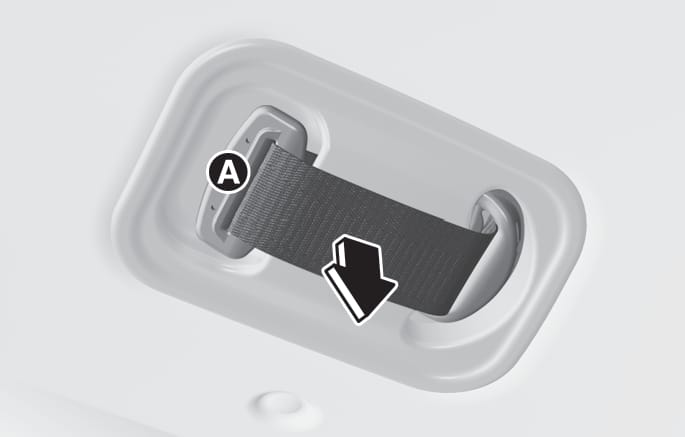
To fasten your seatbelt:
-
Extract the tongue plate (A) from the hole on the belt assembly cover.
B0059KO09
-
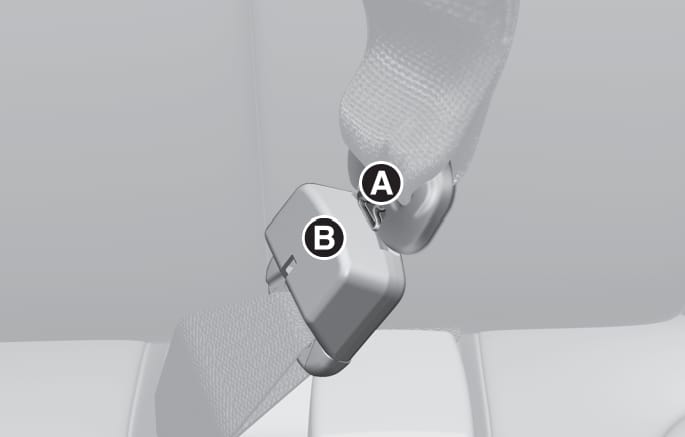
Insert the tongue plate (A) into the buckle (B) until an audible “click” is heard, indicating the latch is locked. Make sure the belt is not twisted.
B0059KO10
-
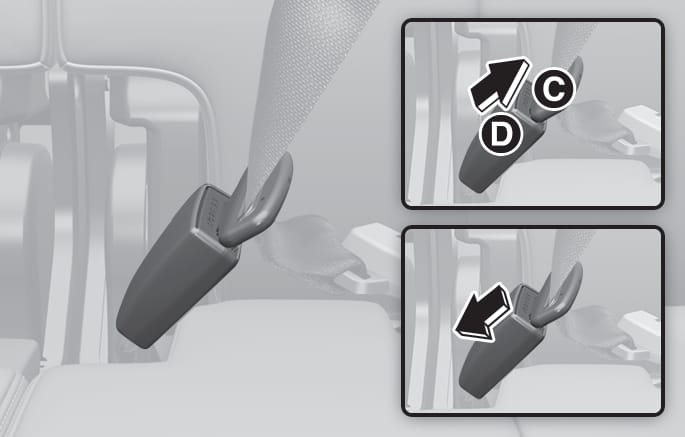
Pull out the tongue plate (C) from the pocket. Pull the tongue plate (C) and insert it into the buckle (D) until an audible “click” is heard, indicating the latch is locked. Make sure the belt is not twisted.
When using the rear center seat belt, the buckle with the “CENTER” mark must be used.
If you are not able to pull out the safety belt from the retractor, firmly pull the belt out and release it. After release, you will be able to pull the belt out smoothly.
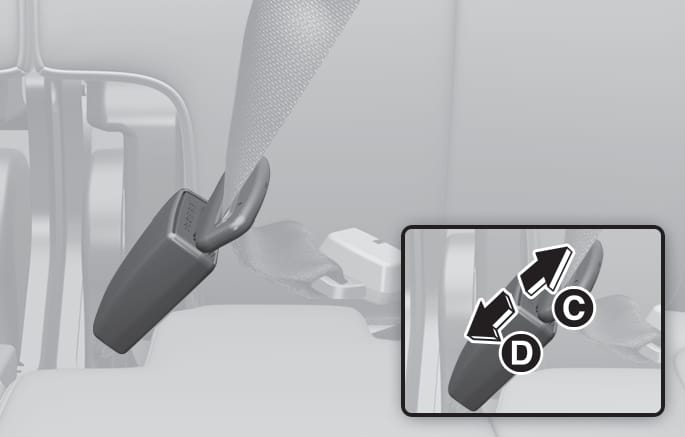
B0059KO13
To release your seatbelt:
-
Press the release button on the buckle (D) and remove the tongue plate (C).
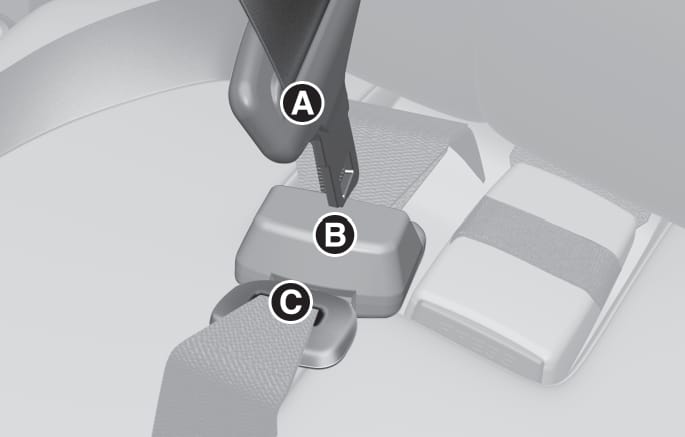
B0059KO14
-
To retract the rear center seatbelt, insert the tongue (C) plate into the web release hole (B). Pull up on the seat belt web and allow the webbing to retract automatically. Insert the tongue plate (A) into the hole on the belt assembly cover.
B0059KO15
B0059KO16
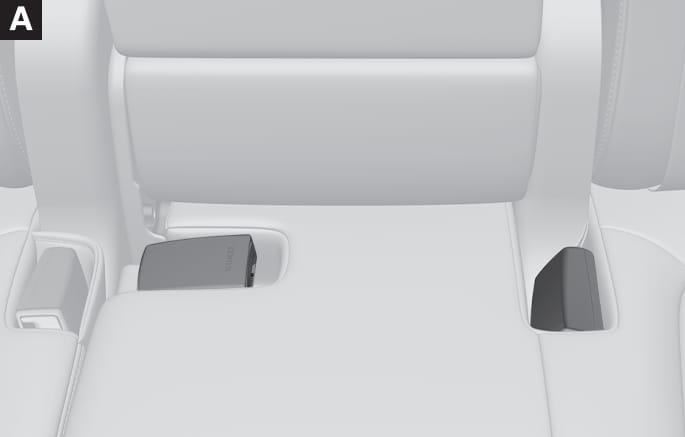
- : 2nd row seat (8-seater)
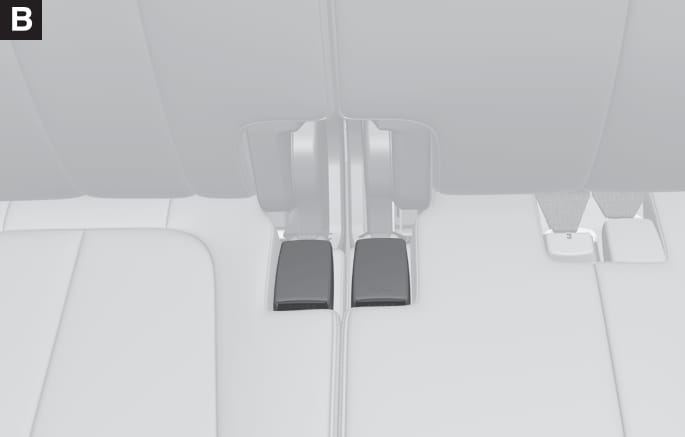
- : 3rd seat
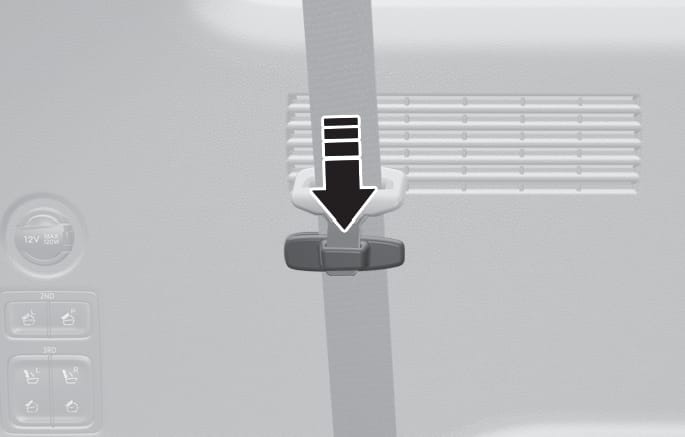
The rear seat belt buckles can be stowed in the pocket between the rear seatback and cushion when not in use.
B0059KO17
Routing the seat belt webbing through the rear seat belt guides will help keep the belts from being trapped behind or under the seats.
After inserting the seat belt, tighten the belt webbing by pulling it up.
When using the seat belt, use it after taking it out of the guides.
If you pull the seat belt when it is stored in the guides, it may damage the guides and/or belt webbing.
B0060KO01
Your vehicle is equipped with driver’s and front passenger’s Pre-tensioner Seat Belts (Retractor Pre-tensioner). The purpose of the pre-tensioner is to make sure the seat belts fit tightly against the occupant’s body in certain frontal or side collision(s). The pre-tensioner seat belts may be activated in crashes where the frontal or side collision(s) is severe enough, together with the air bags.
When the vehicle stops suddenly, or if the occupant tries to lean forward too quickly, the seat belt retractor will lock into position.
In certain frontal collisions, the pre-tensioner will activate and pull the seat belt into tighter contact against the occupant’s body.
If the system senses excessive tension on the driver or passenger’s seat belt when the pre-tensioner system activates, the load limiter inside the retractor pre-tensioner will release some of the pressure on the affected seat belt.
Pre-tensioner Seat Belts that malfunction may not protect you properly during an accident. Take the following precautions:
-
Always wear your seat belt and sit properly in your seat.
-
Do not use the seat belt if it is loose or twisted. A loose or twisted seat belt will not protect you properly in an accident.
-
Do not place anything near the buckle. This may adversely affect the buckle and cause it to function improperly.
-
Always replace your pre-tensioners after activation or an accident.
-
NEVER inspect, service, repair or replace the pre-tensioners by yourself. This must be done by an authorized HYUNDAI dealer.
-
Do not hit the seat belt assemblies.
Do not touch the pre-tensioner seat belt assemblies for several minutes after they have been activated. When the pre-tensioner seat belt mechanism deploys during a collision, the pre-tensioner can become hot and can burn you.
Body work on the front area of the vehicle may damage the pre-tensioner seat belt system. Therefore, have the system be serviced by an authorized HYUNDAI dealer.
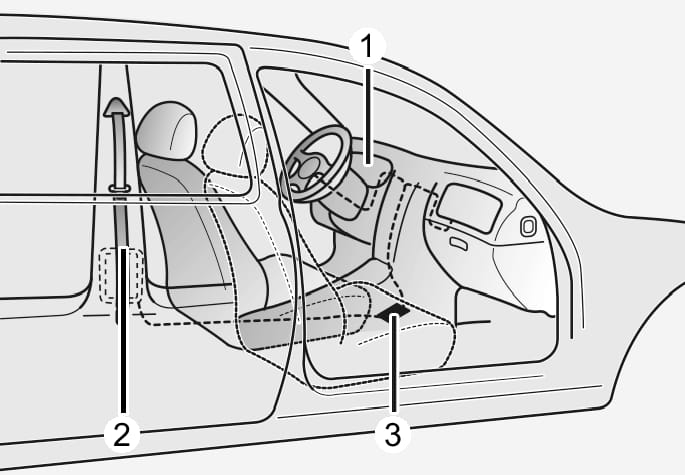
The Pre-Tensioner Seat Belt System consists mainly of the following components. Their locations are shown in the illustration:
OHL038175L
- SRS air bag warning light
- Retractor pre-tensioner
- SRS control module
The sensor that activates the SRS control module is connected with the pre-tensioner seat belts. The SRS air bag warning light on the instrument cluster will illuminate for approximately 3-6 seconds after the ignition switch is in the ON position, and then it should turn off.
If the pre-tensioner is not working properly, the warning light will illuminate even if the SRS air bag is not malfunctioning. If the warning light does not illuminate, stays illuminated or illuminates when the vehicle is being driven, have the pre-tensioner seat belts and/or SRS control module inspected by an authorized HYUNDAI dealer as soon as possible.
-
Both the driver's and front passenger's pre-tensioner seat belts may be activated in certain frontal or side collisions or rollovers.
-
When the pre-tensioner seat belts are activated, a loud noise may be heard and fine dust, which may appear to be smoke, may be visible in the passenger compartment. These are normal operating conditions and are not hazardous.
-
Although it is non-toxic, the fine dust may cause skin irritation and should not be inhaled for prolonged periods. Wash all exposed skin areas thoroughly after an accident in which the pre-tensioner seat belts were activated.
-
The pre-tensioner seat belt system may get adversely affected by installing an audio system to the center console or welding/painting the frontal vehicle body.
In this case, consult an authorized HYUNDAI dealer. The air bag warning light illuminates, if there is a malfunction with the pre-tensioner seat belt system.
-
In following situations, immediately have the air bag system and the pre-tensioner seat belt system checked by an authorized HYUNDAI dealer.
-
The air bag warning light does not illuminate at all after turning ON the engine
-
The air bag warning light remains ON over 3-6 seconds after turning ON the engine
-