Installing a Child Restraint System (CRS)
Before installing your Child Restraint System always:
Read and follow the instructions provided by the manufacturer of the Child Restraint System.
Failure to follow all warnings and instructions could increase the risk of the SERIOUS INJURY or DEATH if an accident occurs.
If the vehicle headrest prevents proper installation of a Child Restraint System, the headrest of the respective seating position shall be readjusted or entirely removed.
After selecting a proper Child Restraint System for your child and checking that the Child Restraint System fits properly on the seating position, there are three general steps for a proper installation:
-
Properly secure the Child Restraint System to the vehicle. All Child Restraint Systems must be secured to the vehicle with the lap belt or lap part of a lap/shoulder belt or with the ISOFIX top-tether and/or ISOFIX anchorage and/or with the support leg.
-
Make sure the Child Restraint System is firmly secured. After installing a Child Restraint System to the vehicle, push and pull the seat forward and from side-to-side to verify that it is securely attached to the seat. A Child Restraint System secured with a seat belt should be installed as firmly as possible. However, some side-to-side movement can be expected.
When installing a Child Restraint System, adjust the vehicle seat and seatback (up and down, forward and rearward) so that your child fits in the Child Restraint System in a comfortable manner.
-
Secure the child in the Child Restraint System. Make sure the child is properly strapped in the Child Restraint System according to the Child Restraint System manufacturer's instructions.
A Child Restraint System in a closed vehicle can become very hot. To prevent burns, check the seating surface and buckles before placing your child in the Child Restraint System.
(Information for use by vehicle users and CRS manufacturers)
-
Yes : Suitable for fitment of the designated category of CRS
-
No : Not suitable for fitment of the designated category of CRS
-
"-" : Not applicable
-
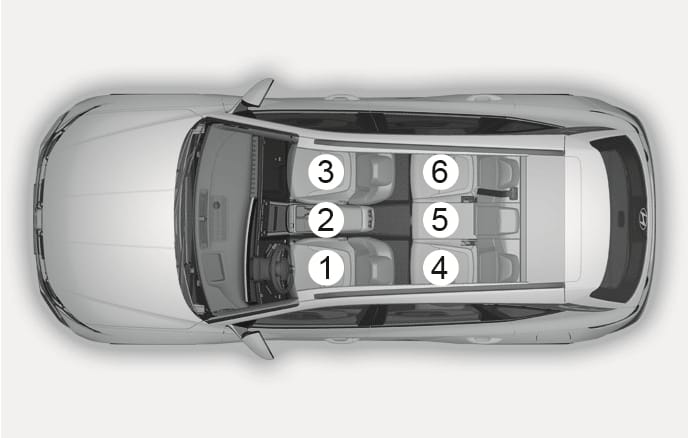
The table is based on LHD vehicle. Except for the front passenger seat, the table is valid for RHD vehicle. For RHD vehicle front passenger seat, please use information for the seating position number 3.
|
CRS categories |
Seating positions |
|||||||
|
1 |
2 |
3 |
4 |
5 (3 Point Belt) |
6 |
|||
|
AirbagON |
AirbagOff |
|||||||
|
Universal belted CRS |
All mass groups |
- |
- |
No |
Yes1)F, R |
Yes F, R |
Yes2) F, R |
Yes F, R |
|
i-size CRS |
ISOFIX CRF : F2, F2X, R1, R2 |
- |
- |
No |
No |
Yes F, R |
- |
Yes F, R |
|
Carry-cot (ISOFIX lateral facing CRS) |
ISOFIX CRF: L1, L2 |
- |
- |
No |
No |
No |
- |
No |
|
ISOFIX infant* CRS(* : ISOFIX baby CRS) |
ISOFIX CRF : R1 |
- |
- |
No |
No |
Yes R |
- |
Yes R |
|
ISOFIX toddler CRS - small |
ISOFIX CRF : F2,F2X, R2,R2X |
- |
- |
No |
No |
Yes F, R |
- |
Yes F, R |
|
ISOFIX toddler CRS - large* (* : not booster seats) |
ISOFIX CRF : F3,R3 |
- |
- |
No |
No |
Yes F, R |
- |
Yes F, R |
|
Booster Seat - reduced Width |
ISO CRF : B2 |
- |
- |
No |
No |
Yes |
No |
Yes |
|
Booster Seat - full Width |
ISO CRF : B3 |
- |
- |
No |
No |
Yes |
No |
Yes |
F: Forward facing / R: Rearward facing
Note1): If cushion height adjuster function is equipped, cushion should be adjusted to the highest position. Otherwise (not equipped cushion height adjuster function) seatback should be adjusted to upright position.
Note2): To install CRS, seat back should be adjusted to upright position.
|
CRS categories |
Seating positions |
|||||||
|
1 |
2 |
3 |
4 |
5 (2 Point Belt) |
6 |
|||
|
AirbagON |
AirbagOff |
|||||||
|
Universal belted CRS |
All mass groups |
- |
- |
No |
Yes1)F, R |
Yes F, R |
No |
Yes F, R |
|
i-size CRS |
ISOFIX CRF : F2, F2X, R1, R2 |
- |
- |
No |
No |
Yes F, R |
- |
Yes F, R |
|
Carry-cot (ISOFIX lateral facing CRS) |
ISOFIX CRF: L1, L2 |
- |
- |
No |
No |
No |
- |
No |
|
ISOFIX infant* CRS(* : ISOFIX baby CRS) |
ISOFIX CRF : R1 |
- |
- |
No |
No |
Yes R |
- |
Yes R |
|
ISOFIX toddler CRS - small |
ISOFIX CRF : F2,F2X, R2,R2X |
- |
- |
No |
No |
Yes F, R |
- |
Yes F, R |
|
ISOFIX toddler CRS - large* (* : not booster seats) |
ISOFIX CRF : F3,R3 |
- |
- |
No |
No |
Yes F, R |
- |
Yes F, R |
|
Booster Seat - reduced Width |
ISO CRF : B2 |
- |
- |
No |
No |
Yes |
No |
Yes |
|
Booster Seat - full Width |
ISO CRF : B3 |
- |
- |
No |
No |
Yes |
No |
Yes |
F: Forward facing / R: Rearward facing
Note1): If cushion height adjuster function is equipped, cushion should be adjusted to the highest position. Otherwise (not equipped cushion height adjuster function) seatback should be adjusted to upright position.
|
Seat Number |
Position in the vehicle |
Seating positions |
|
1 |
Front left |
|
|
2 |
Front center |
|
|
3 |
Front right |
|
|
4 |
2nd row left |
|
|
5 |
2nd row center |
|
|
6 |
2nd row right |
* If the vehicle headrest prevents proper installation of a CRS, the headrest of the seating position shall be readjusted or entirely removed.
* Never place a rearward facing Child Restraint System on the front passenger seat, unless the air bag is deactivated.
-
-
Information for use by vehicle users and CRS manufacturers
-
|
Mass group |
Name |
Manufacturer |
Type of Fixation |
ECE-R44 Approval No. |
|
Group 0+/I/II/III |
JOIE SPIN 360 |
JOIE |
ISOFIX & Leg Support Type (Rear & Forward-Facing) |
E11 - 041621 |
CRS Manufacturer information (For Latin America)
JOIE : https://www.joiebaby.com
The ISOFIX system holds a Child Restraint System during driving and in an accident. This system is designed to make installation of the Child Restraint System easier and reduce the possibility of improperly installing your Child Restraint System. The ISOFIX system uses anchors in the vehicle and attachments on the Child Restraint System. The ISOFIX system eliminates the need to use seat belts to secure the Child Restraint System to the rear seats.
ISOFIX anchorages are metal bars built into the vehicle. There are two lower anchors for each ISOFIX seating position that will accommodate a Child Restraint System with lower attachments.
To use the ISOFIX system in your vehicle, you must have a Child Restraint System with ISOFIX attachments.
The Child Restraint System manufacturer will provide you with instructions on how to use the Child Restraint System with its attachments for the ISOFIX anchorages.
2C_ALRSeatBeltLowerAnchorOverview
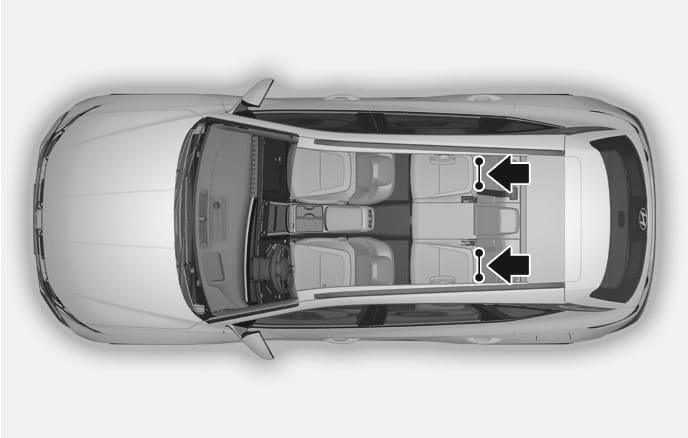
ISOFIX anchorages have been provided in the left and right outboard rear seating positions. Their locations are shown in the illustration.
Do not attempt to install a Child Restraint System using ISOFIX anchorages in the rear center seating position. There are no ISOFIX anchorages provided for this seat. Using the outboard seat anchorages, for the CRS installation on the rear center seating position, can damage the anchorages.
2C_ALRSeatBeltLowerAnchor
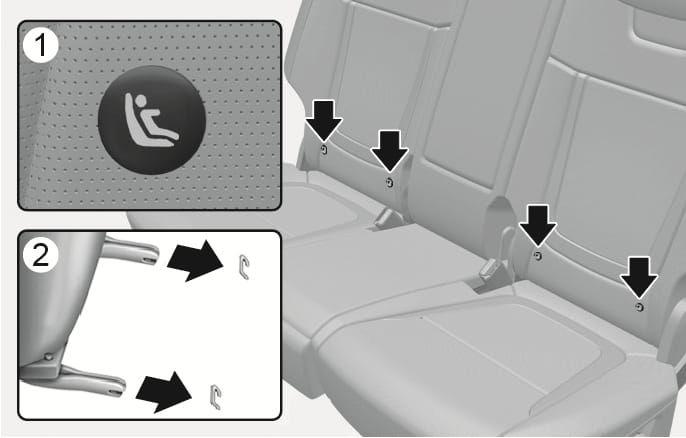
- ISOFIX Anchorage Position Indicator (Type A-
Ŏ , Type B-ŏ ) - ISOFIX Anchorage
ISOFIX anchorages are located between the seatback and the seat cushion of the rear seat left and right outboard seating positions, indicated by the symbols.
In addition, ISOFIX anchorages are located between the seatback and the seat cushion of the front passenger seat outboard seating positions. (if equipped)
To install an i-Size or ISOFIX-compatible Child Restraint System in either of the rear outboard seating positions and the front passenger outboard seating positions (if equipped):
-
Move the seat belt buckle away from the ISOFIX anchorages.
-
Move any other objects away from the anchorages that could prevent a secure connection between the Child Restraint System and the ISOFIX anchorages.
-
Place the Child Restraint System on the vehicle seat, then attach the seat to the ISOFIX anchorages according to the instructions provided by the Child Restraint System manufacturer.
-
Follow the instructions of the Child Restraint System's manufacturer for proper installation and connection of the ISOFIX attachments on the Child Restraint System to the ISOFIX anchorages.
Take the following precautions when using the ISOFIX system:
-
Read and follow all installation instructions provided with your Child Restraint System.
-
To prevent the child from reaching and taking hold of unretracted seat belts, buckle all unused rear seat belts and retract the seat belt webbing behind the child. Children can be strangled if a shoulder belt becomes wrapped around their neck and the seat belt tightens.
-
NEVER attach more than one Child Restraint System to a single anchorage. This could cause the anchor or attachment to come loose or break.
-
Following an accident, we recommend to have the ISOFIX system inspected by your HYUNDAI dealer. An accident can damage the ISOFIX system and may not properly secure the Child Restraint System.
2C_ALRSeatBeltTetherAnchor
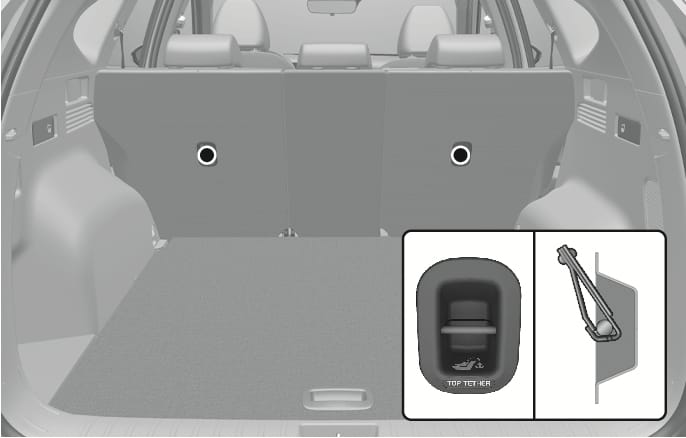
Top-tether anchorages for Child Restraint Systems are located on the rear of the seatbacks.
2C_ALRSeatBeltTetherAnchorInstall
-
Route the Child Restraint System top-tether strap over the seatback. Placing the top tether strap, follow the instructions of the Child Restraint System manufacturer.
-
Connect the top-tether strap to the top-tether anchorage, then tighten the top-tether strap according to the instructions of your Child Restraint System's manufacturer to firmly attach the Child Restraint System to the seat.
Take the following precautions when installing the top-tether:
-
Read and follow all installation instructions provided with your Child Restraint System.
-
NEVER attach more than one Child Restraint System to a single ISOFIX top-tether anchorage. This could cause the anchorage or attachment to come loose or break.
-
Do not attach the top-tether to anything other than the correct top-tether anchorage. It may not work properly if attached to something else.
-
Child Restraint System anchorages are designed to withstand only those loads imposed by correctly fitted Child Restraint System.
Under no circumstances are they to be used for adult seat belts or harnesses or for attaching other items or equipment to the vehicle.
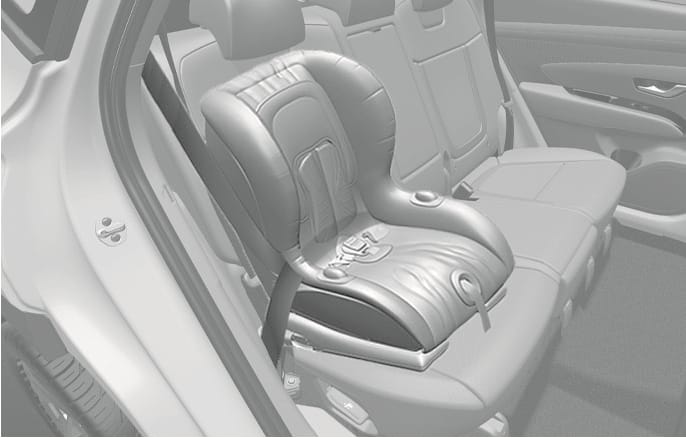
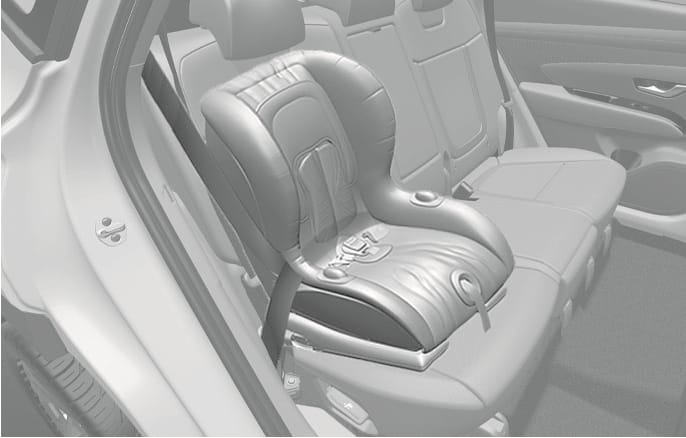
When not using the ISOFIX system, all Child Restraint Systems must be secured to a rear seat with the lap part of a lap/shoulder belt.
2C_ALRSeatBeltInstall
Installing a Child Restraint System with a lap/shoulder belt
To install a Child Restraint System on the rear seats, do the following:
-
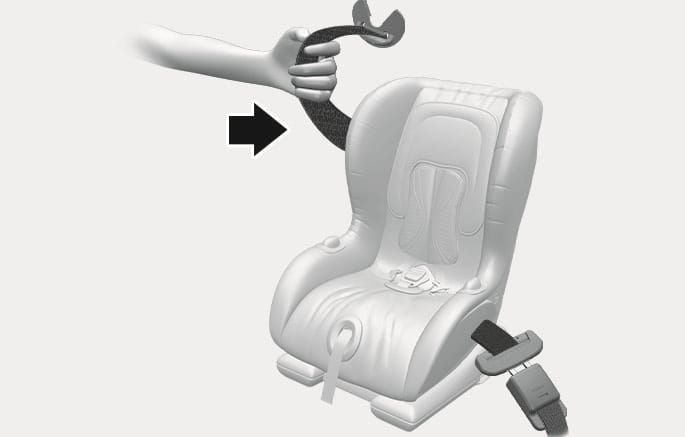
Place the Child Restraint System on a rear seat and route the lap/shoulder belt around or through the Child Restraint System, following the Child Restraint System manufacturer's instructions. Make sure the seat belt webbing is not twisted.
2C_ALRSeatBeltInstall_2
-
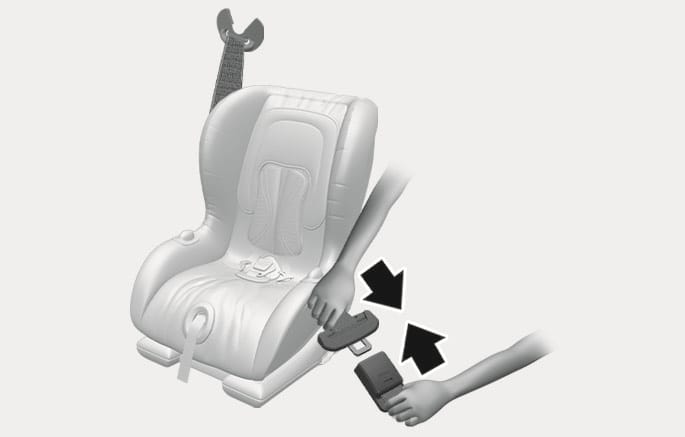
Fasten the lap/shoulder belt latch into the buckle. Listen for the distinct "click" sound.
Position the release button so that it is easy to access in case of an emergency.
-
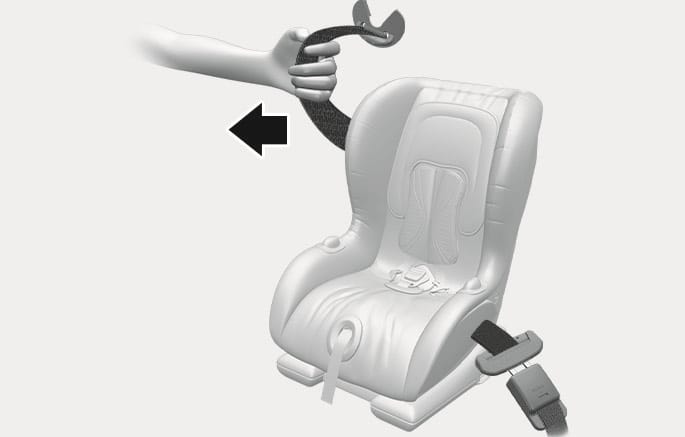
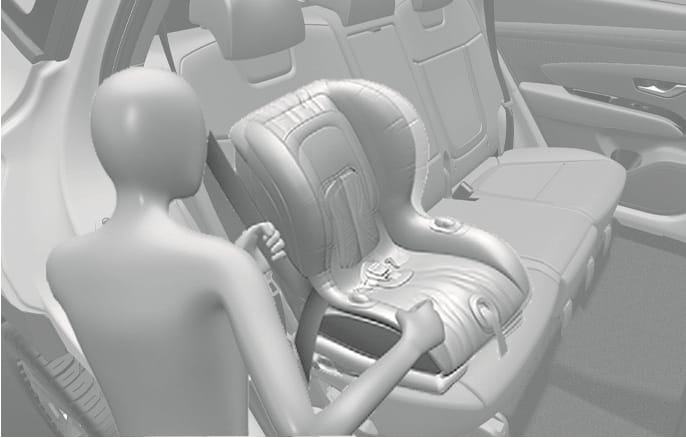
Remove as much slack from the belt as possible by pushing down on the Child Restraint System while feeding the shoulder belt back into the retractor.
2C_ALRSeatBeltInstall_3
2C_ALRSeatBeltInstall_4
-
Push and pull on the Child Restraint System to confirm that the seat belt is holding it firmly in place.
2C_ALRSeatBeltInstall_5
If your Child Restraint System manufacturer recommends the use of a top-tether with the lap/shoulder belt, see page Securing a Child Restraint System seat with "Top-tether Anchorage" system.
To remove the Child Restraint System, press the release button on the buckle and then pull the lap/shoulder belt out of the Child Restraint System and allow the seat belt to retract fully.